

How Do You Size Replacement Filter Bags and Cages?
From measurement points and top load vs. bottom load to bag-to-cage fit, cage specs and what to put in an RFQ
01 · WHAT TO MEASURE
What Do You Measure on Filter Bags and Cages Before Requesting a Quote?
For filter bags, measure the tube sheet hole diameter, flat width and length; for cages, measure the mid-body OD, length and number of vertical wires. Add ring spacing, top and bottom construction and material, and you can specify replacement filter bags and cages on the same basis.
In a pulse jet baghouse, the filter bag is pulled over a cage and collects dust on its outer surface.[1] During cleaning, a pulse of compressed air enters the bag and inflates it sharply, and the shock knocks the dust cake off.[1] For the bag to return properly after the pulse, it must fit the cage along its full length.[2] That is why bag and cage dimensions are matched as a pair rather than specified separately.
This article covers only measurement and fit, not when or how to replace bags. For replacement decisions and procedures, see the Filter Bag Replacement Guide.
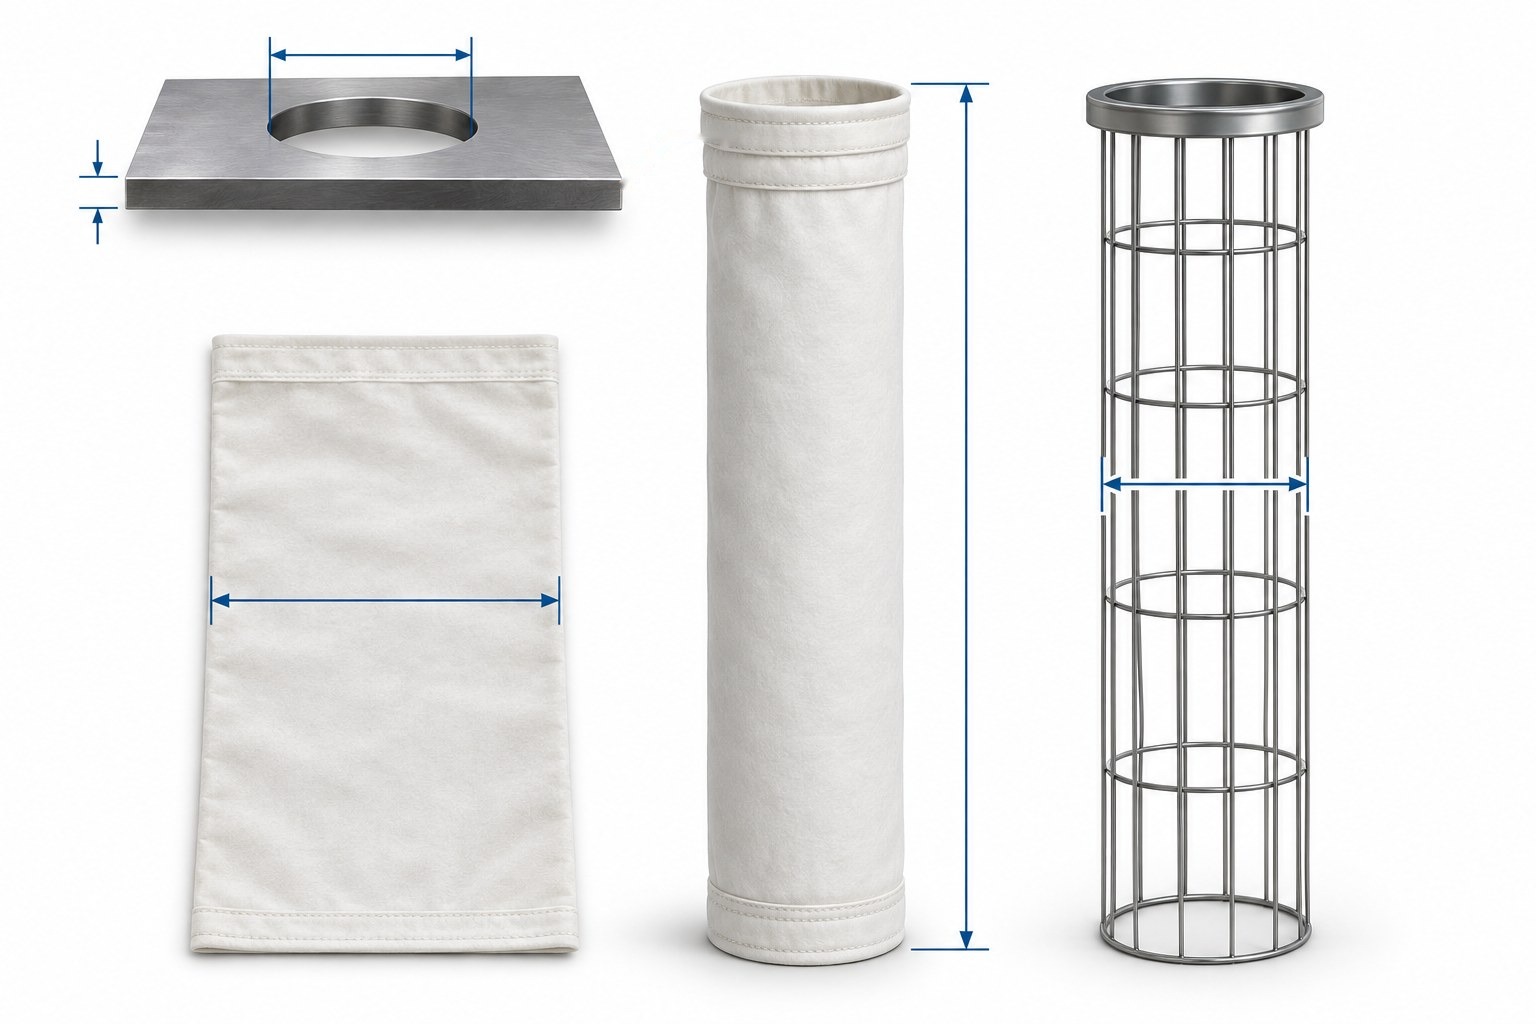 12345
Figure 1. Five points to measure before quoting. Numbers match the cards below; actual shapes and dimensions vary by unit.
Source: Based on Micro-one in-house technical data · AI-assisted concept illustration · Not actual shape or dimensions
Measure the Filter Bag First, Then the Cage
For top load snap band bags, measure flat width, length and fit to the cage, in that order; for cages, measure overall length, diameter, bottom construction, number of rings, ring spacing, number of vertical wires, material and top construction, in that order.[3] Shaker bags add items such as tail length, number of plies and wear cuffs, so this article is based on pulse jet bags.[3]
02 · TOP LOAD & BOTTOM LOAD
How Does Top Measurement Differ Between Top Load and Bottom Load?
In top load designs, a snap band in the bag top snaps into the tube sheet hole; in bottom load designs, a raw edge bag top is folded over the cage top and secured with a clamp.[4][5] Different mounting styles mean different top styles, reference dimensions and length rules.
| Item | Top load | Bottom load |
|---|---|---|
| Filter bag top | Snap band (metal ring) seats in the tube sheet hole | Raw edge fabric folded over the cage top and secured with a T-bolt clamp |
| Cage top | Turned-down flange top, with or without venturi | Split collar (rolled band) top |
| Reference dimension | Tube sheet hole diameter | Mounting hub or venturi |
| Filter bag length | Same as the cage or ½″ (about 13 mm) longer | 4″ (about 102 mm) overlap with the cage top; 2″ (about 51 mm) for some OEMs |
| Example dimensions | Hole 6.25″ / bag 5.875″ / cage 5.625″; cage lengths 96″, 120″, 144″ (about 2.4, 3.0, 3.7 m); 12-wire; rings on 8″ centers | Bag 5.865″ (about 149.0 mm), lengths 100″ and 124″ / cage 5.625″, lengths 96″ and 120″, 12-wire (Flex-Kleen style). Bag 4.625″ / cage 4.5″, 10-wire (MikroPul twist-lock style) |
In the bottom load example, 100″ and 124″ bags paired with 96″ and 120″ cages are consistent with the 4″ overlap rule.[4] The figures in the table are examples given by each supplier and vary by unit.
Snap Band Bags Are Sized to the Hole Diameter
A snap band is a metal ring sewn into the bag top and covered with fabric; it seats in the tube sheet hole and holds the bag in place.[6] The snap band must match the hole to seal, so that dust does not bypass the filter.[6] Measure the hole in a straight line through the center from edge to opposite edge; because snap bands are made in 1/32″ (about 0.8 mm) increments, calipers give the most accurate reading.[6] The diameter of the bag body is almost always slightly smaller than the hole.[6]
The hole diameter is often cited as the hardest dimension to confirm. Check it with calipers or OEM drawings; if it cannot be measured, confirm it by test-fitting a sample bag or cuff.[4] Tube sheet thickness is also a checklist item on supplier specification forms.[7]
On Raw Edge Bags, the Clamp Does the Sealing
On raw edge bags (with OEM ring-top cages), the fabric edge is captured between the cage top and the cup, and a T-bolt clamp prevents leakage.[5] In Parker's installation instructions, the T-bolt clamp sits between the gap in the top and the bag seam on rolled-band-top cages; on OEM ring-top cages, it is positioned so the screw sits midway between the gap and the seam.[5] The clamp requires higher tightening torque than usual, and the sheet for OEM ring-top cages says not to reinstall used clamps.[5]
Re-measure Reference Dimensions From the Parts, Not the Purchase Order
Reordering the same size from old purchase records can let small errors build up order after order. This is called size drift; when you suspect it, re-measure the reference part: the tube sheet hole for top load, or the mounting hub or venturi for bottom load.[4] Accumulated dimensional mismatch can lower collection efficiency, increase emissions and damage equipment components.[6]
03 · DIAMETER & LENGTH
How Do You Determine Filter Bag Diameter and Length?
Diameter is calculated from the measured flat width, and length is measured from the top reference point to the first bottom stitch. Flat width is the width across the bag when pressed flat, and it is considered both the most important and the most frequently mis-measured value. A slack bag's diameter cannot be measured accurately, so measure the flat width and convert it, to an accuracy within ⅛″ (about 3.2 mm).[4] True diameter can only be measured accurately on a factory jig.[6] Measure the flat width on the bag body only, not across the snap band.[6]
Circumference (C) = flat width (W) × 2 → diameter (D) = C ÷ π
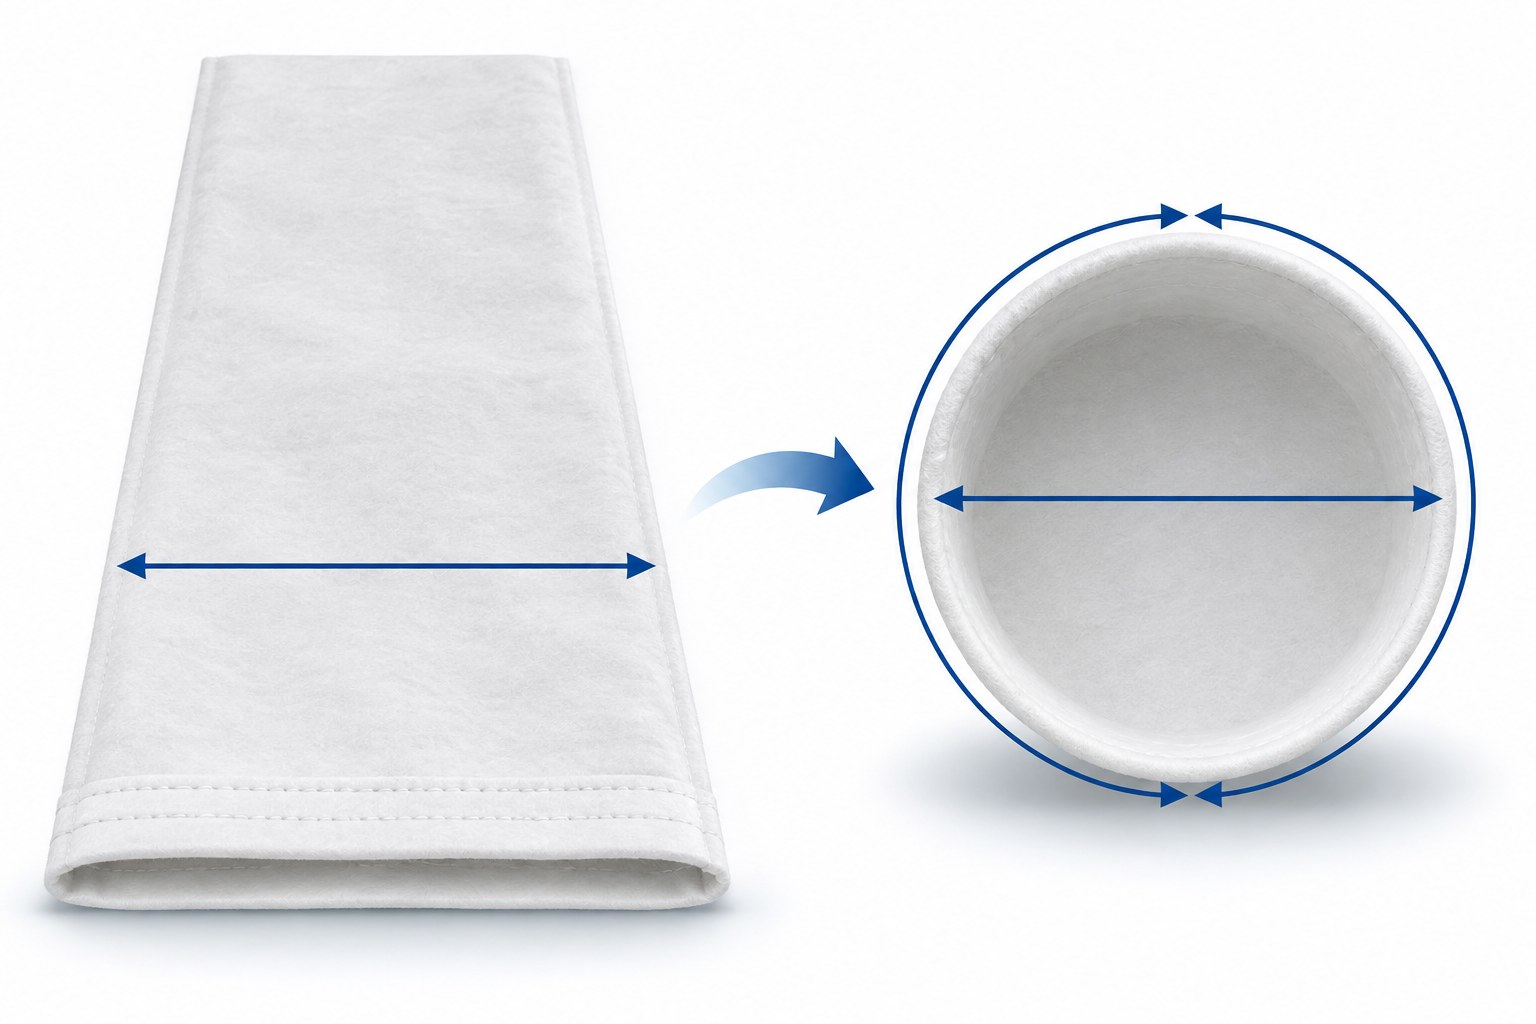 123
Figure 2. Diameter (D) follows from the fact that flat width (W) is half the circumference (C). Numbers match the cards below.
Source: Based on Micro-one in-house technical data · AI-assisted concept illustration · Not actual shape or dimensions
For example, a 235 mm flat width gives a 470 mm circumference and a diameter of about 150 mm. Seam allowance can make the actual diameter differ slightly, so confirm with the supplier. A ⅛″ error in flat width is about 2 mm in diameter (calculated).
Length Is Referenced Differently by Mounting Style
- Top load: Measure along the seam from the center of the snap band to the first bottom stitch,[3] and make the bag the same length as the cage or ½″ (about 13 mm) longer.[4]
- Bottom load: Allow a 4″ (about 102 mm) overlap with the cage top; some OEMs specify 2″ (about 51 mm).[4]
- Bottom: All example bags have disc bottoms; state the bottom style in the RFQ as well.
EPA cost data also groups pulse jet bags into two diameter ranges, about 114–130 mm (4½–5⅛″) and about 152–203 mm (6–8″), and its cage price notes refer to 8 ft and 10 ft (about 2.44 and 3.05 m) cages.[1] The table below shows top load dimension examples from supplier literature. The filter media is not stated, so use them to get a feel for typical sizes, not as a specification basis.
| Tube sheet hole | Bag diameter | Cage diameter | Bag–cage diameter difference (calculated) | Source |
|---|---|---|---|---|
| 6.25″ (158.8 mm) | 5.875″ (149.2 mm) | 5.625″ (142.9 mm) | About 6.4 mm | Baghouse.com measuring guide[4] (12-wire, rings on 8″ centers) |
| 6.25″ (158.8 mm) | 5.875″ (149.2 mm) | 5.5″ (139.7 mm) | About 9.5 mm | Baghouse.com snap band guide[6] (labeled 'most common') |
| 5″ (127.0 mm) | 4.625″ (117.5 mm) | 4.5″ (114.3 mm) | About 3.2 mm | Baghouse.com measuring guide[4] (12-wire, rings on 8″ centers) |
Two articles from the same company pair a 6.25″ hole and a 5.875″ bag with different cages, 5.625″ and 5.5″. The snap band guide says the cage is usually ¼″ smaller, yet also gives examples with ⅛″ and ⅜″ differences.
04 · FIT
How Much Bag-to-Cage Clearance Is Right?
Clearance depends on the filter media: about 6–10 mm is typical for felt, and a tighter 3–5 mm or less for fiberglass and membrane-laminated felt. This clearance is called pinch, meaning how much larger the bag diameter is than the cage diameter.[4] A fit that is too loose or too tight reduces collection efficiency and shortens bag life.[4] The table below shows three suppliers' recommendations.
| Filter media | Baghouse.com[4] | Micronics[3] | Standard Filter[8] |
|---|---|---|---|
| Felt | ¼–⅜″ (6.4–9.5 mm, snap band measuring section); ¼–½″ (6.4–12.7 mm, glossary section) | ¼~⅜″(6.4~9.5 mm) | About ¼–⅜″ (6.4–9.5 mm) |
| Woven fiberglass | ⅛″ or less (3.2 mm or less) | ⅛″ or less (3.2 mm or less) | 3/16″(4.8 mm) |
| Membrane felt | ⅛″ or less (3.2 mm or less) | ⅛″ or less (3.2 mm or less) | Not stated |
| P84 and PTFE membrane | Says only that tighter tolerances may be needed, with no figure | Not stated | Not stated |
This summarizes each supplier's recommendations; it is not a ranking, and these are not values set by Micro-one. The final allowable clearance depends on supplier specifications and site conditions. Standard Filter's value is the amount pinched up at a ring, so it is not directly equivalent to a diameter difference.
Why Check the Filter Media Type First
Even within one page, Baghouse.com gives different values: ¼–⅜″ for standard top load bags, ¼–½″ in its glossary section, and ⅛″ or less for fiberglass and membrane felt, so confirm the fabric type first.[4] Choosing the media itself is covered in How Do You Choose the Right Filter Bag Material for Your Process?, and how membranes capture dust in Depth Filtration vs. Surface Filtration: What Is the Difference?.
Fiberglass and membrane felt bags must not be stretched tight over the cage.[4] Forcing a bag onto a cage to reduce clearance creates problems of its own. For fiberglass, Baghouse.com and Micronics say ⅛″ or less while Standard Filter says 3/16″, so do not settle on a single value; follow the supplier's specification.
Standard Filter explains that excessive pinch causes premature wear and can let dust migrate through the media, while too tight a fit reduces the dust cake's ability to release.[8] The snap band guide likewise notes that too tight a fit makes cages hard to install and remove and keeps the bag from flexing properly during the pulse, reducing cleaning energy.[6]
Leave About a Thumb's Width at the Cage Bottom
Top load snap band bags need about a thumb's width of space between the cage bottom and the bag's bottom disc.[4] This is lengthwise clearance, so check it when setting bag length.
Worked Example: Same Bag, Different Cage
A 5.875″ bag on a 5.625″ cage gives a diameter difference of about 6.4 mm; on a 5.5″ cage, about 9.5 mm (calculated). For felt, both combinations fall within the table's range, but for woven fiberglass or membrane felt bags both (even 6.4 mm) exceed the ⅛″ (3.2 mm) or less range, so change the cage or adjust the bag diameter.
Baghouse.com defines pinch as how much larger the bag diameter is than the cage diameter, while the Standard Filter FAQ gives its recommendation as the amount that can be pinched at a ring. State the measurement method alongside the value in the RFQ.
05 · CAGE SPEC
What Should You Specify for a Cage?
Specify mid-body OD, length, bottom construction, number and spacing of rings, number of vertical wires, material and top construction. Measure the OD at the widest mid-section between wires; measuring the circumference with a pi tape is more accurate.[4] Some OEMs make the bottom pan slightly smaller than the body, so do not measure near the bottom.[4]
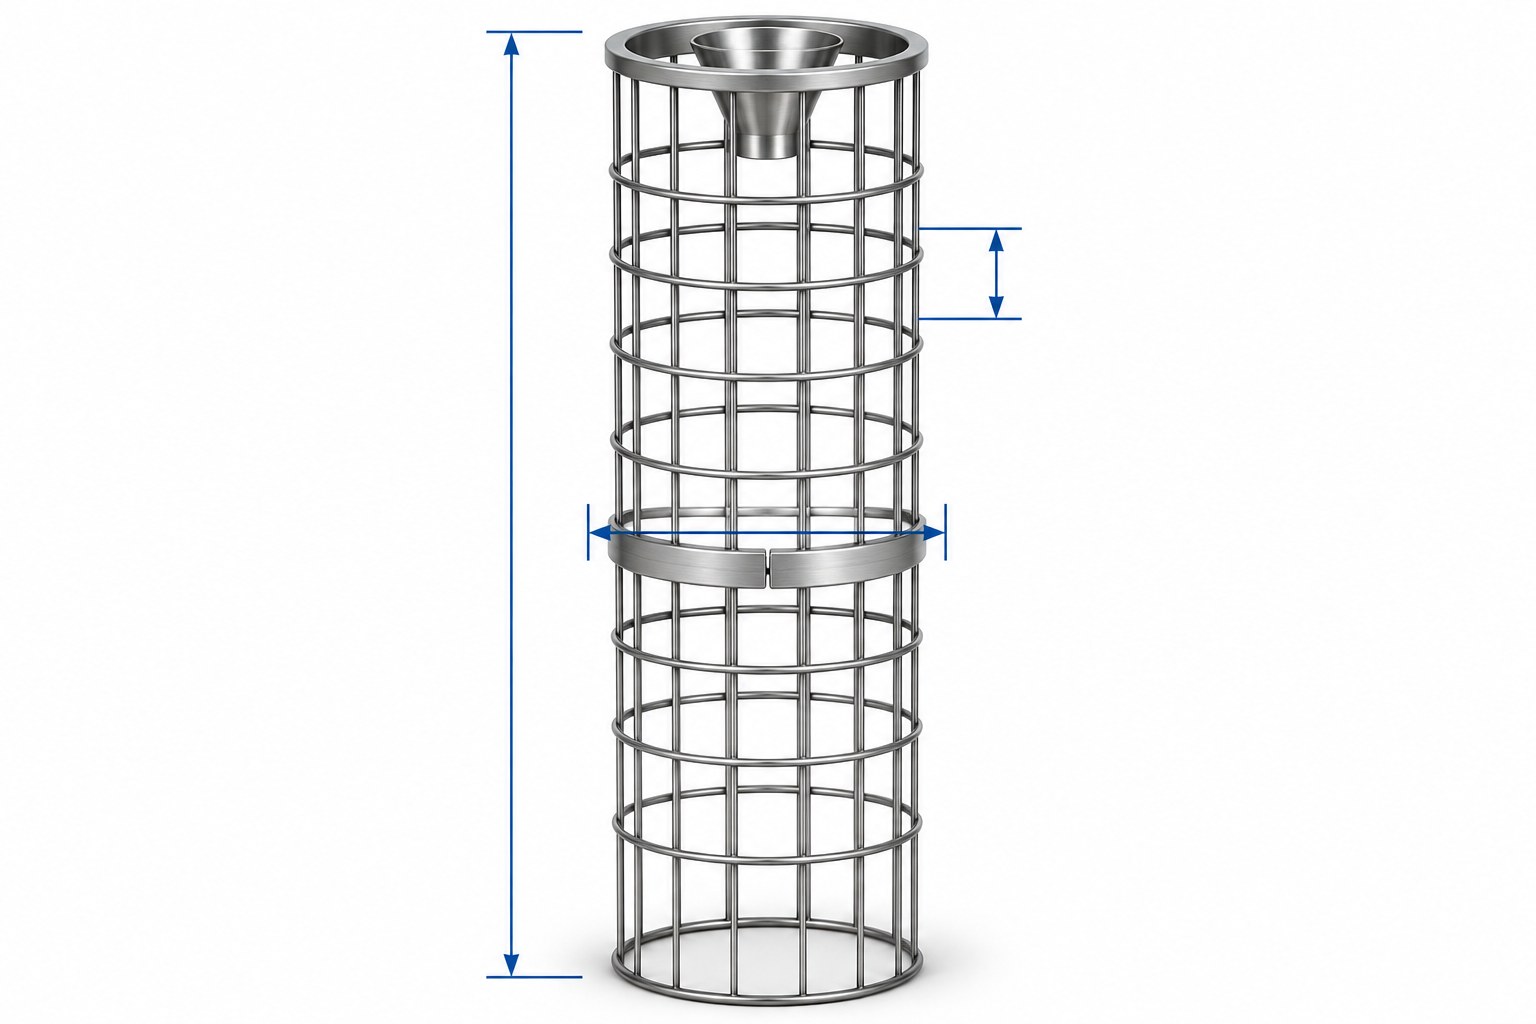 12345
Figure 3. Cage measurement and specification points. Numbers match the cards below; actual shapes vary by product.
Source: Based on Micro-one in-house technical data · AI-assisted concept illustration · Not actual shape or dimensions
Record Bottom Construction and Ring Spacing Separately
Note whether the bottom cup is crimped or welded to the wires, count the rings and measure their spacing. The distance from the last ring to the bottom cup may differ from the other ring spacings.[4] Ring spacings of 4″, 6″ and 8″ (about 102, 152 and 203 mm) are listed, and cage diameters range from 4″ to 6⅛″ (about 102–156 mm).[9]
A Venturi Draws Extra Air Into the Cleaning Pulse
Some units pass the cleaning air through a short venturi to induce additional air,[1] and a cage venturi should be measured for length and identified as drop-in or integral (welded to the cage top).[4] Venturi lengths of 3″ to 6″ (about 76–152 mm) are listed, in attached and drop-in versions.[9] For a split top, measure from the groove to the top end.[4] Where plenum height is limited, a two-piece split cage is an option.[9]
Wire Count Depends on the Filter Media
The Baghouse.com measuring guide lists 10-, 12- and 14-wire cages for most fabrics and 20-wire cages for fiberglass and P84 or PTFE membrane, noting that ring spacing can also be tightened.[4] The same company's cage product page says 10, 12 and 20 wires are common, and 5, 6, 8, 16 and 24 are also available.[9] A 1998 patent on cages for fiberglass filter bags compares conventional cages using 16–20 wires in its detailed description, and its background explains that fiberglass has very poor fatigue resistance to repeated bending around small radii.[10]
Match the Material to the Service Environment
Listed cage materials are carbon steel, galvanized, epoxy-coated and stainless steel (304, 316).[9] Galvanized or stainless steel is recommended where moisture or acid corrosion is present.[9]
06 · CHECK ORDER
What Should You Check Before Quoting to Avoid Sizing Errors?
The five conditions below are wear and damage factors to check alongside dimensions. If any of them applies, check not only the clearance but also cage condition and filter bag media conditions.
- Too tight a fit: Cages are hard to install and remove, and the bag does not flex properly during the pulse, reducing cleaning energy.[6]
- Excessive pinch: Premature wear can occur, and dust can migrate through the media.[8]
- Fiberglass filter bags: The fabric is vulnerable to repeated bending around small radii, and impact and abrasion against cage wires and rings are also described as causes of wear.[10]
- Bent or rusted cages: Sharp edges quickly cut bag fabric during the pulse, and bent cages make bags rub against each other or the housing wall.[2]
- Bags secured only at the top: Bag bottoms that sway in gas turbulence and rub against other bags wear faster.[1]
Inspect Cages Before Changeout
Cages can bend or warp from handling during changeouts, stacking loads in storage, or fires and temperature excursions, and can rust from acidic or alkaline constituents, high humidity and condensation.[2] Do not use bent, rusted or sharp-edged cages; bags installed on them tend to fail early.[6] Work sequence matters too: remove the blowpipes first to reach the tube sheet, set aside cages to be reused so they are not damaged, and replace in sections if headroom is tight.[6] Store spare cages so they do not corrode, and do not stack them too high.[2]
Verification Steps and Decisions by Result
| Step | What | Against what | Who | Decision |
|---|---|---|---|---|
| 1 | Measure the filter bags and cages in service | Hole, flat width, length, cage mid-body OD, wire count (precision: flat width within ⅛″; hole with calipers in 1/32″ increments) | Plant engineer | Decide whether to send used parts to the supplier for any items not measured |
| 2 | Clearance: bag diameter − cage diameter | In mm, recorded with the measurement method, compared with the recommended range in the table | Plant engineer and supplier | If within range, specify as is; if outside, go to step 3 |
| 3 | Review adjustments if out of range | Option to change cage diameter or bag diameter (flat width) | Supplier and plant engineer | Decide whether to replace cages or adjust bag diameter |
| 4 | Inspect existing cages | Bends, rust, sharp edges | Plant engineer | Reuse if sound; replace damaged cages together with the bags |
| 5 | Test-fit a sample bag | Ease of cage installation and removal, fit[6] | Supplier and plant engineer | If no issues, proceed to production; if issues, readjust dimensions |
Reference values in the table are ranges from supplier literature; final values are set site by site.
Organize the RFQ Into Four Groups
Grouping the data into tube sheet, filter bag, cage and operating conditions makes missing items easy to spot. If the hole cannot be measured because the unit is running, you can get a quote first from flat width and length, then confirm with a sample bag test fit before production.[6] Including the current filter media and past filtration problems helps the review.[7]
| Group | Items |
|---|---|
| Tube sheet | Hole diameter, thickness[7] |
| Filter bag | Mounting style, top style, flat width, length, bottom style, reinforcements |
| Cage | Mid-body OD, length, bottom construction, number and spacing of rings, number of vertical wires, venturi or split, material |
| Operating conditions | Gas flow, maximum temperature, cleaning method and dust-collecting side, current filter media, past filtration problems |
FAQ
Frequently Asked Questions
Can I get a quote by sending just one used filter bag?
Yes. With a used bag in hand, the flat width, length and top style can be confirmed from the actual bag. If you also provide the hole diameter and cage dimensions, the specification can be more precise.
Can I reuse my existing cages with new filter bags?
Yes, if they are not bent, rusted or sharp-edged. Replace damaged cages. First check that the cage diameter suits the new bag diameter using the recommended ranges in the table, and if you are switching from felt to fiberglass or membrane media, also check that the wire count and ring spacing are suitable.
Do membrane filter bags need less cage clearance than felt?
Yes. Supplier literature gives ⅛″ (about 3 mm) or less for membrane-laminated felt and ¼–⅜″ (about 6–10 mm) for felt. However, the bag must not be stretched tight over the cage, so do not make the clearance too small.
What if I cannot measure the tube sheet hole?
You can get a quote first from flat width and length, then test-fit a sample bag before production to confirm the fit in the hole. Sending a used bag for checking is another option.
- US EPA, "Air Pollution Control Cost Manual, Section 6, Chapter 1: Baghouses and Filters," 1.2.3 Pulse-Jet (pp. 1-7 to 1-8), Table 1.8 (pp. 1-42 to 1-43). Link
- Baghouse.com, "Can I reuse my baghouse cages when I change my filters?" web page (manufacturer literature), accessed 2026-11-06. Link
- Micronics, "Measuring Filter Bags & Cages," web page (manufacturer literature), accessed 2026-11-06. Link
- Baghouse.com, "How to Measure Your Baghouse Filters & Cages," web page (manufacturer literature), accessed 2026-11-06. Link
- Parker (BHA), "Installation Instructions – Bottom Load," installation PDF (manufacturer literature), accessed 2026-11-06. Link
- Baghouse.com, "Top Load Snap Band Measuring Guide," web page (manufacturer literature), accessed 2026-11-06. Link
- WOKU Filtermedien, "Specification Filter Hoses/Bags," specification form PDF (manufacturer literature), accessed 2026-11-06. Link
- Standard Filter, "FAQ," web page (manufacturer literature), accessed 2026-11-06. Link
- Baghouse.com, "Dust Collector Filter Cages," web page (manufacturer literature), accessed 2026-11-06. Link
- US 5,800,580 A, "Support cage for glass fiber bag filter," 1998 (cited only for background and comparison with conventional cages). Link